Installation Process
The Most Common Backsplash Installation Mistakes Homeowners Notice Too Late
A backsplash may seem like a small project, but small installation mistakes can become highly visible once the work is finished. This guide explains the most common backsplash mistakes homeowners notice too late and what to look for before hiring an installer.
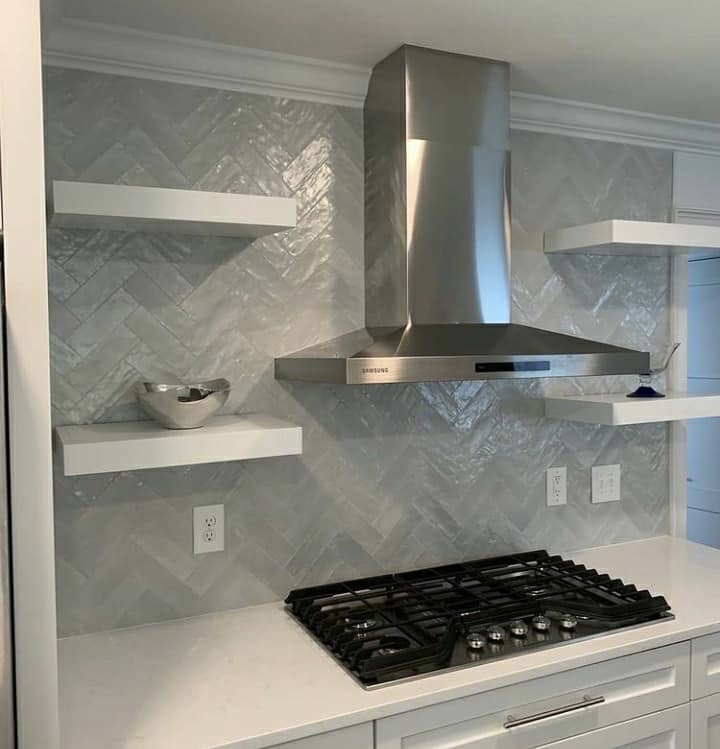
A kitchen backsplash is small enough to seem simple, but detailed enough to expose weak craftsmanship.
That is why backsplash installation mistakes can be so frustrating for homeowners. The project may only cover the space between the countertop and cabinets, but the finished tile sits directly at eye level. Crooked lines, uneven grout, rough outlet cuts, awkward edges, and poor transitions are easy to notice once the work is complete.
Many of these mistakes are not obvious during the estimate. They show up after the tile is installed, grouted, and cleaned.
For Charlotte-area homeowners comparing backsplash installers, the goal is not just to choose a tile. The goal is to understand whether the installer has a clear plan for layout, prep, cuts, outlets, trim, grout, and finishing details before the project begins.
Why Backsplash Mistakes Stand Out
A backsplash is one of the most visible surfaces in the kitchen.
It sits close to cabinets, countertops, outlets, switches, windows, range hoods, and open wall edges. Because it touches so many finished surfaces, even small mistakes can become noticeable.
Backsplash mistakes often stand out because:
- The tile is installed at eye level
- Cabinet and countertop lines create visual reference points
- Grout lines make alignment issues easier to see
- Outlets and switches interrupt the pattern
- Edges and stopping points are highly visible
- Under-cabinet lighting can highlight uneven surfaces
- The range wall often becomes a focal point
- The finished backsplash is viewed every day
A backsplash does not need to be complicated to require careful planning. Even a simple subway tile layout can look unfinished if the details are handled poorly.
Mistake 1: Starting Without a Layout Plan
One of the most common backsplash mistakes is beginning installation without a clear layout plan.
The installer should not simply start in a corner and work across the wall without considering how the tile will land at the ends, around the range, near outlets, below cabinets, and at open edges.
A good layout plan considers:
- Where the tile should start
- How the pattern should center
- How the tile will land at each end
- Whether cuts will look balanced
- How outlets and switches affect the pattern
- Whether the range wall needs special attention
- Where the backsplash should stop
- How trim or exposed edges will be handled
Poor layout planning can lead to small slivers of tile at the ends, awkward cuts around outlets, off-center patterns, or tile that stops in a way that feels accidental.
A clean backsplash should look intentional from the first glance. For layout context, see backsplash layouts explained.
Mistake 2: Not Centering the Range Wall
The range wall is often the most visible part of the backsplash.
In many kitchens, the cooktop, range, hood, or microwave creates a natural focal point. If the tile pattern is not planned around that area, the entire backsplash can feel slightly off.
This is especially important for:
- Herringbone layouts
- Chevron patterns
- Mosaic features
- Framed range-wall details
- Vertical stack tile
- Large-format tile
- Full-height backsplash sections
Not every backsplash must be centered the same way, but the focal area should be reviewed before installation. A pattern that feels random behind the range can make the project look less refined, even if the rest of the tile is installed correctly.
For a premium result, the most visible area should feel controlled.
Mistake 3: Poor Outlet and Switch Planning
Outlets and switches are one of the biggest challenges in backsplash installation.
They interrupt the tile pattern and require detailed cuts. If they are not planned well, they can make the backsplash look messy.
Common outlet-related mistakes include:
- Rough or chipped cuts around outlet boxes
- Tile pieces that look awkward around switches
- Outlets that sit unevenly after installation
- Cover plates that do not sit cleanly
- Pattern lines that break awkwardly around electrical openings
- Small tile pieces squeezed between outlets and edges
- Poor coordination with mosaic or herringbone layouts
A backsplash may look good across the open wall, but if the outlet cuts are sloppy, that is often what the homeowner notices first.
This is one reason more complex layouts require more planning. A herringbone or mosaic backsplash around multiple outlets is a different installation challenge than a simple tile pattern on an uninterrupted wall.
Mistake 4: Rough or Inconsistent Tile Cuts
Tile cuts reveal the level of care behind the installation.
A finished backsplash often includes cuts around cabinets, outlets, switches, windows, range hoods, trim, open wall edges, and countertop returns. These cuts should look clean, controlled, and intentional.
Poor cuts may look:
- Jagged
- Chipped
- Uneven
- Too tight
- Too wide
- Misaligned
- Rushed
- Inconsistent from one area to another
Some materials are more demanding than others. Glass, marble, porcelain, mosaics, handmade tile, and specialty shapes may require more careful handling and cutting.
Clean cuts are especially important in highly visible areas, such as the range wall, the end of a backsplash, the inside corner of a kitchen, or the area around light switches.
The goal is not just to make the tile fit. The goal is to make the finished surface look polished. For more on execution quality, see what makes a tile installation look high-end.
Mistake 5: Ignoring Wall Prep
A backsplash is only as good as the wall behind it.
If the surface is uneven, damaged, dirty, poorly patched, or covered with old adhesive, the finished tile may not sit cleanly. Wall prep is not the most visible part of the project, but it strongly affects the final result.
Wall prep may involve:
- Removing old backsplash material
- Scraping adhesive residue
- Repairing drywall damage
- Addressing uneven surfaces
- Cleaning the wall
- Checking for problem areas
- Preparing the surface for proper tile bonding
Skipping prep can lead to uneven tile, lippage, poor adhesion, visible waves, or inconsistent grout lines.
This is especially important when replacing an existing builder-grade backsplash. Removal can damage drywall, and that damage needs to be addressed before new tile is installed.
A lower quote may not always include the same level of prep. Homeowners should ask what surface preparation is included before comparing installation prices.
Mistake 6: Choosing the Wrong Trim or Edge Detail
Edges are where many backsplashes start to look unfinished.
A backsplash usually needs to end somewhere. It may stop at a cabinet line, countertop edge, window, open wall, range area, or outside corner. Those stopping points need to be planned.
Common edge mistakes include:
- Tile ending in an awkward location
- No finished edge where one is needed
- Trim color that does not fit the kitchen
- Trim profile that looks too heavy or too thin
- Exposed tile edges
- Poorly cut end pieces
- Inconsistent caulk lines
- Edge detail that feels like an afterthought
Edge options may include metal trim profiles, bullnose tile, finished tile edges, caulked transitions, or natural stopping points.
The right choice depends on the tile, wall layout, cabinet placement, and overall kitchen style.
A premium backsplash should not leave the homeowner wondering why the tile stopped where it did.
Mistake 7: Uneven Grout Lines
Grout lines have a major effect on how finished a backsplash looks.
When grout joints are inconsistent, the backsplash can look crooked even if the tile material itself is attractive. Uneven grout is especially noticeable with simple patterns, stacked layouts, herringbone, mosaics, and high-contrast grout.
Uneven grout lines can be caused by:
- Poor layout planning
- Irregular wall surfaces
- Inconsistent tile spacing
- Tile size variation
- Rushed installation
- Poor sheet alignment with mosaics
- Not adjusting for handmade tile variation
Some materials naturally have variation, especially handmade or zellige-style tile. That does not mean the installation should look careless. It means the installer needs to understand the material and plan the grout joints accordingly.
Consistent grout lines help the backsplash feel clean and professional.
Mistake 8: Choosing Grout Color Too Late
Grout color should not be a last-minute decision.
The wrong grout color can make a backsplash feel too busy, too harsh, too flat, or disconnected from the kitchen.
Grout affects:
- Pattern visibility
- Warmth or coolness
- Contrast
- Maintenance perception
- How clean the tile edges look
- Whether the backsplash feels subtle or bold
A white tile with white grout creates a very different look than white tile with charcoal grout. A marble-look tile with soft gray grout feels different than the same tile with bright white grout. Handmade tile may look more refined with a softer tonal grout than with a high-contrast joint.
Homeowners should review grout color with the tile, countertop, cabinets, lighting, and layout before installation begins.
Grout is not only a technical material. It is part of the design.
Mistake 9: Poor Mosaic Sheet Alignment
Mosaic tile can look detailed and high-end when installed well, but it can also reveal mistakes quickly.
Many mosaics come mounted on sheets. If those sheets are not aligned carefully, the seams between sheets may become visible after grouting. This can create a grid effect that was not intended.
Mosaic mistakes may include:
- Visible sheet lines
- Uneven spacing between sheets
- Crooked pattern movement
- Inconsistent grout joints
- Poor cuts around edges
- Awkward outlet cuts
- Pattern distortion near corners
Mosaics often require more patience than homeowners expect. The installer may need to adjust individual pieces, blend sheets, and carefully control spacing.
A mosaic backsplash should look like one continuous surface, not a collection of sheets.
Mistake 10: Treating Herringbone Like a Simple Pattern
Herringbone is popular because it creates movement and a more custom look.
It is also one of the patterns where poor planning becomes very noticeable.
Common herringbone mistakes include:
- Pattern not centered
- Uneven cuts at the edges
- Crooked movement across the wall
- Poor outlet coordination
- Awkward corners
- Inconsistent spacing
- Range-wall layout that feels off-balance
Herringbone usually requires more cuts, more layout control, and more attention to alignment than a standard running bond pattern.
That does not mean homeowners should avoid it. It means herringbone should be priced, planned, and installed according to its complexity.
When installed well, herringbone can make a backsplash feel elevated. When rushed, it can make the wall feel chaotic.
Mistake 11: Not Protecting the Kitchen Properly
Backsplash installation happens in a finished kitchen.
That means counters, cabinets, floors, appliances, and surrounding surfaces need to be respected during the process.
Proper protection may include:
- Countertop protection
- Floor protection
- Dust control
- Care around cabinets
- Care around appliances
- Clean work areas
- Responsible debris handling
- Final cleanup
A backsplash project should not leave the kitchen feeling careless or damaged.
Home protection is part of the installation experience, especially for homeowners who value professionalism and a clean process.
Mistake 12: Poor Transitions at Countertops, Cabinets, and Walls
A backsplash touches multiple surfaces. Those meeting points should look clean.
Common transition areas include:
- Tile to countertop
- Tile to cabinet
- Tile to painted drywall
- Tile to window trim
- Tile to range hood
- Tile to open wall edge
- Tile to inside corner
- Tile to outside corner
Poor transitions can make the backsplash feel unfinished.
The issue is not always dramatic. Sometimes it is a messy caulk line, an uneven gap, a tile that dies into the wall awkwardly, or a trim piece that does not match the rest of the kitchen.
Strong transitions usually feel quiet. They do not call attention to themselves.
Mistake 13: Forgetting About Lighting
Lighting can expose backsplash issues.
Under-cabinet lighting, natural light, pendant lighting, and shadows can all make uneven surfaces, lippage, grout inconsistencies, and rough cuts more visible.
This is especially true with:
- Glossy tile
- Glass tile
- Zellige-style tile
- Handmade tile
- Large-format tile
- Dark grout
- Highly reflective finishes
The installer should understand that the backsplash will not only be seen in daylight. It will also be seen under task lighting and evening lighting.
A surface that looks acceptable in dim light may look very different once under-cabinet lights are turned on.
Mistake 14: Using the Wrong Material for the Desired Result
Sometimes the issue is not the installation alone. It is a mismatch between the material and the homeowner's expectations.
For example:
- Handmade tile will not look perfectly uniform
- Zellige-style tile will have surface and edge variation
- Marble may require more care than porcelain
- Glass tile may show adhesive or cutting issues more readily
- Mosaics may have more grout maintenance
- Highly textured tile may collect more residue behind a range
- Large-format tile may require flatter walls and more careful planning
A good backsplash starts with the right material for the kitchen, lifestyle, and desired finish.
The installer should help the homeowner understand how the tile choice affects installation and maintenance before the project begins. For material context, see best backsplash materials for a high-end kitchen.
Mistake 15: Comparing Quotes Without Comparing Scope
One of the biggest mistakes homeowners make happens before installation starts.
They compare backsplash quotes by price alone.
A backsplash quote should be reviewed for what it includes, not just the final number.
Homeowners should ask:
- Is demo included?
- Is wall prep included?
- Are standard setting materials included?
- Is grout included or purchased separately?
- Is tile trim included?
- Are outlet cuts included?
- Is the pattern priced correctly?
- Is dust control included?
- Is cleanup included?
- Is the backsplash area clearly defined?
- Are custom features priced separately?
A lower quote may leave out details that affect the final result. A higher quote should clearly explain what additional prep, complexity, material handling, or finish detail is included.
The right comparison is not cheap versus expensive. It is complete versus incomplete. See kitchen backsplash cost in the Charlotte area for planning ranges and scope factors.
How to Avoid Backsplash Installation Mistakes
Homeowners can avoid many backsplash problems by asking the right questions before hiring an installer.
Before the project begins, ask:
- How will the backsplash layout be planned?
- Where will the pattern start and stop?
- How will the range wall be handled?
- How will outlets and switches be cut around?
- What happens if the wall needs repair after demo?
- What trim or edge detail is recommended?
- How should the grout color be selected?
- What is included in the installation price?
- How will the kitchen be protected?
- What type of finished detail should I expect?
The answers should be clear.
A professional installer should be able to explain the process without making the homeowner feel overwhelmed.
What CBC Focuses On During Backsplash Planning
CBC's backsplash approach is built around preventing the types of mistakes homeowners notice after the installer leaves.
That means reviewing the project as more than a square-foot installation.
CBC considers:
- Layout direction
- Pattern complexity
- Wall condition
- Material type
- Outlet and switch locations
- Range-wall visibility
- Edge and trim details
- Grout direction
- Protection and cleanup
- Finished appearance
The goal is not to make every backsplash complicated. The goal is to make sure the finished result looks intentional.
A simple backsplash can still feel premium when the details are handled well. A complex backsplash can only feel premium when it is planned properly.
Explore backsplash installation services or view completed backsplash projects for layout, cuts, and finish reference.
Final Takeaway
A backsplash may be a smaller project than a full kitchen remodel, but it is not a throwaway detail.
The most common backsplash installation mistakes usually come from weak planning, rushed prep, poor layout decisions, rough cuts, uneven grout, bad outlet coordination, wrong trim choices, or unfinished transitions.
Those mistakes are often noticed too late — after the tile is installed, grouted, and part of the kitchen.
The best way to avoid them is to choose an installer who understands the full backsplash process, not just how to place tile on a wall.
A clean backsplash should look planned, balanced, and finished from edge to edge.
Planning a Backsplash Project in the Charlotte Area?
CBC helps homeowners plan backsplash installations with clean layout, proper prep, controlled cuts, thoughtful edge details, and a polished finished result.
Request a backsplash estimate to review your kitchen, material direction, installation complexity, and project scope.
FAQ
What are the most common backsplash installation mistakes?
Common backsplash mistakes include poor layout planning, rough outlet cuts, uneven grout lines, awkward tile edges, poor trim choices, weak wall prep, visible mosaic sheet lines, off-center patterns, and unfinished transitions.
Why do backsplash outlet cuts matter so much?
Outlets and switches interrupt the tile pattern and sit directly in the visible backsplash area. Rough or poorly planned outlet cuts can make the entire installation look rushed, even if the open wall areas look acceptable.
Can a simple backsplash still look high-end?
Yes. A simple backsplash can look high-end when the layout is balanced, cuts are clean, grout lines are consistent, edge details are finished, and the tile fits the kitchen. High-end does not always mean complicated.
Does wall prep affect backsplash quality?
Yes. Poor wall prep can lead to uneven tile, weak adhesion, inconsistent grout lines, and visible surface problems. If old tile is removed or the drywall is damaged, the wall may need repair before new tile is installed.
How can I avoid hiring the wrong backsplash installer?
Compare more than price. Ask how the installer handles layout planning, outlet cuts, wall prep, grout selection, trim, edge details, protection, cleanup, and final transitions. A clear scope helps prevent surprises after installation begins.